Documentation
Web Campaigns
Web Campaigns allow you to display targeted pop-ups, slide-ins, and floating bars directly on your website. Whether you want to collect email leads, announce a flash sale, or prevent cart abandonment, web campaigns intercept the user at the perfect moment.
1. Prerequisites
- AlgorithmX Web Pixel: The tracking pixel must be embedded in the
<head>of your website to enable rendering and behavior tracking. - Domain Whitelisting: Ensure the domain where you intend to run the campaign is whitelisted in your workspace settings.
2. Step-by-Step Guide
Step 1: Campaign Rules
Navigate to CAMPAIGNS > Web Campaigns and click + New Campaign.
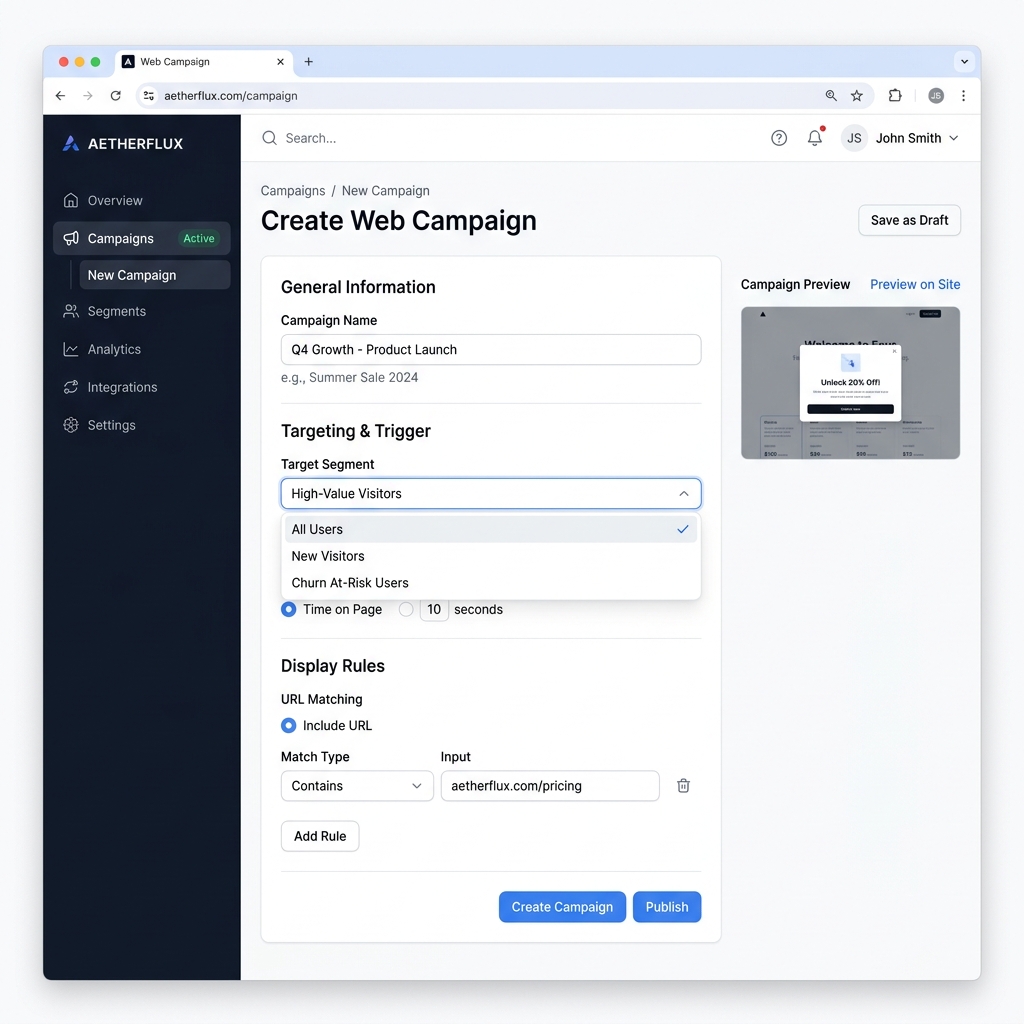
- Campaign Name: Provide a descriptive internal name.
- Display Rules: Define where the campaign should appear (e.g.,
URL contains /pricingorURL equals /checkout).
Step 2: Trigger Conditions
Web Campaigns rely on specific web behaviors to trigger.
- Target Segment: Choose a dynamic segment or target "All Visitors".
- Trigger Behavior: Choose when to show the campaign:
- Time on Page: After 10 seconds.
- Scroll Depth: After scrolling 50% of the page.
- Exit Intent: When the user's mouse moves towards the close button.
Step 3: Design the Widget
- Format Selection: Choose between
Lightbox Pop-up,Floating Bar, orSlide-in. - Visual Editor: Customize the colors, fonts, and upload an image.
- Form/Action: Add input fields (e.g.,
Email Address) if this is a lead capture campaign, or add a simple CTA button if it's an announcement.
Step 4: Publish
Review your targeting rules, set an active duration date, and click Publish. The web pixel will immediately start serving the campaign to eligible visitors.
3. Configuration Reference
| Field Name | Type | Description / Best Practice |
| :--- | :--- | :--- |
| Display Rules | Logic | Control exact URLs. Best Practice: Use wildcards (e.g., /products/*) to target an entire category. |
| Exit Intent Trigger | Toggle | Only triggers when the mouse leaves the viewport. Extremely effective for cart abandonment pop-ups. |
| Widget Format | Picker | The UI layout. Lightboxes block the screen, while Floating Bars remain sticky at the top/bottom without disrupting reading. |
| Submission Action | Dropdown | What happens after the user submits the form? Options: Show Success Message, Redirect to URL, or Close Widget. |
4. Best Practices & Troubleshooting
Best Practices
- Respect User Experience: Avoid triggering full-screen pop-ups the second a user lands on your site. Wait at least 15 seconds or use a scroll trigger.
- Mobile Considerations: Exit intent does not work on mobile devices (no mouse). Ensure you set a fallback trigger (like time-on-page) for mobile visitors.
Troubleshooting
[!CAUTION] Pop-up Not Showing? If your web campaign isn't rendering:
- Verify that your ad-blocker is disabled during testing.
- Ensure your browser isn't blocking third-party scripts if you haven't configured a custom subdomain proxy.
- Clear your browser cookies; you may have already dismissed the pop-up, triggering the "Do not show again" cooldown period.